 I love Jackfruits! So, when Jai & Bee of Jugalbandi announced that they had chosen this amazing fruit for JFI-May, I was more than thrilled!! Jackfruit or 'Fanas' as it is called in Marathi can be seen in abundance in the months of May-June in India. Our summer shopping trips were never complete without the purchase of some sweet ripe jackruit (which we call 'Gare'), from the 'thelas' (handcarts) that used to be parked on the roadside, proudly displaying their treasures!
I also love the green raw jackfruit, more than the ripe one frankly. It has a very meaty texture and one needs to develop a taste for it. It is also difficult to cut through the fresh green jackfruit. I remember my mom dipping the knife in oil and smearing some oil on her hands before she cut it. It was a tedious task, but thanks to the canned jackfruit available here, all I have to do is open it with a can opener! Much simpler, right ? :)
My mom used to make a very spicy and delicious curry with raw jackfruit, which I love! But it is a little time-consuming and I did not have enough time to make it this time. So I chose an appetizer recipe from my mom's diary which is relatively quick to prepare and sinfully delicious! Enjoy!!
Jackfruit Kababs
Ingredients: (makes 12 kababs)
Raw Jackruit (1 can) or about 250 gms fresh
Chana dal 1/4 cup
Jeera (cumin seeds) 1/2 tsp
Kaale mire (black peppercorns) 1/2 tsp
Cloves 3
Cinnamon 1/2 a stick
Ginger 1" piece
Garlic cloves 2 big
Onion 1 medium sized
Red dry chillies 1
Green chiilies 1-2 (as per taste)
Cilantro 1-2 tsp
Water about 1 cup
Salt
Method:
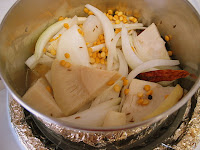
If using fresh jackfruit, peel and chop it. For canned, just drain out the liquid. In a saucepan, put to boil the jackfruit pieces in the water along with half an onion, green and red chillies, dal, ginger, garlic, jeera, cloves, peppercorns, cinnamon and salt. Simmer till tender and then let all the liquid evaporate completely.
 Grind to a fine paste in a blender/food processor. Remove the spices that are difficult to grind. Mix remaining onion (chopped finely) and cilantro. Check for taste. Add a little cayenne pepper if its not spicy enough. Mix well and then make small flat patties. These can then either be deep fried in oil or baked in the oven. I generally bake them in a preheated 375 degrees oven till they are golden brown (this can take a while, say 40 mins). Serve with mint chutney.
 (This picture was taken in hurry and hence not great, but I assure you the recipe is very good and it looks better than in this picture...)
 'Ratala' which is the Marathi name for 'Sweet Potato' is a starchy root vegetable. It is relatively low in calories and has no fat or cholesterol. It is rich in beta-carotene, and has five times the recommended daily allowance of vitamin A. It is also loaded with potassium. More on the Sweet Potato here.
When I first came to the US, I had great confusion regarding this vegetable. I am sure you are curious as to why...well, I knew this vegetable as 'Ratala' in my native language and as 'Sweet Potato' in English. So whats the problem, right? The problem was that the Sweet Potato is called 'Yam' in the US of A and the 'Yam' as Sweet Potato! So much confusion! Finally, I turned to a source which I knew would not let me down...Google, and as was expected got all the answers I needed. What a happy ending! :)
Moving on...'Ratala' for Maharashtrians is always associated with fasting (Upaas). It is one of the few vegetables that is allowed to be consumed during a fast.Some of the few days when a majority of Maharashtrians observe a fast are Ekadashi, Mahashivratri, Sankashti chaturthi, etc...
When I was growing up, I used to love it when my mom & dad were fasting. There were two good reasons for this; one, I would not have to eat poli- bhaaji (chapati -vegetable), and two, the spread that was laid out on the table during a fast was much more delicious...there used to be 'ratalyacha kees', sabudana (sago) khichadi, 'kakdichi koshimbir' (cucumber salad), 'daanyacha ladoo' (peanut laddoo-- I will post this recipe soon), 'upaasachi batata bhaaji' (stir- fried potato)...I think you get the picture. All the dishes were generally cooked in homemade ghee and the minimal of spices were used, mainly, green chillies cumin seeds and salt! It was a feast in itself!!! And I am sure you are wondering as to why is this called a 'Fast'? ;) But we have a saying to justify our behaviour, 'Ekadashi ani duppat khaashi' , which simply means that during a fast, people eat double of what they normally would eat. I must warn you though, that eating huge quantities of these dishes on a single day might give you a little bit of acidity due to the generous use of crushed peanuts.
My husband and me both enjoy these recipes frequently even if we are not fasting. They sometimes make for a quick breakfast or brunch and are always delicious. So today, as part of Nupur's 'R' of Indian Vegetables, I am going to share my recipe for 'Ratalyacha Kees' which is nothing but stir-fried grated Sweet Potato. This recipe is also going for 'RCI- Maharashtrian Cuisine'.
 Ingredients:
Ratali (Sweet Potatoes) 2
Jeera (Cumin seeds) 1 tsp
Hirvi Mirchi (Green chillies) 2-3 chopped
Crushed peanut powder 1 -2 tbsp
Oil / Saajuk Tup (ghee) 1 tbsp
Salt as per taste
Kothimbir (Cilantro) to garnish
Method:
Wash the sweet potatoes thoroughly, wipe them dry with a cloth and then grate them. You can either peel the skin off or leave it. I generally do not peel off the skin. Make sure that if you are not going to cook the grated sweet potatoes immediately, cover them with water like this...
 In a pan/kadhai, heat the oil/ghee. Add the jeera and then the green chillies. Fry for a minute
 or so, and then add the grated sweet potatoes (make sure to squeeze out the water from the potatoes before adding to the pan). Mix well, cover with a lid and cook for about 3-4 minutes till white steam escapes from the pan. Once cooked, add the crushed peanut powder (make sure the peanuts are roasted), and salt to taste. Garnish with cilantro and serve hot. To enjoy it even more, serve a little plain yogurt on the side.

This post is in continuation of my previous post for 'Quick Tomato Saar'. Masaale Bhaat is one of the traditional Maharashtrian recipes. The word 'Masaale' refers to the generous use of 'Kaala (Goda) masala in this recipe, and 'Bhaat' means rice in Marathi. There are several variations to making Masaale Bhaat, the most common being using 'Tondli (Tindora/Indian Ivy Gourd)', in which case it is also called 'Tondli Bhaat'. Masaale Bhaat is so full of flavor that it can be enjoyed just like that with a dollop of ghee. The most popular combo of course, is that with 'Tomato saar'. Jazz it up with some paapad (poppadom) and a lemon wedge and you will find yourself in seventh heaven!
Ingredients: (serves 2)
Tandul (Uncooked Rice) 3/4 cup
Tondli (Tindora) 1/4 cup (fresh or frozen)
Kadhipatta (Curry leaves) about 3-4
Kaaju (Cashews) 2 tbsp
Hirvi mirchi (green chilli) paste 2 tbsp (adjust to your level of spiciness)
Kaala/Goda masala 2-3 tbsp
Water 1.5cups
Salt as per taste
Oil 1 tbsp
Mohri (Mustard seeds) 1 tsp
Jeera (Cumin seeds) 1 tsp
Hing (Asafoetida) 1/2 tsp
Haldi (Turmeric powder) 1tsp
To Garnish:
Naral (Grated coconut)
Kothimbir (Cilantro) chopped
Method:
Wash the rice and keep aside. In a pressure cooker pan or any regular pan heat the oil. Once the oil is ready, prepare fodni/tadka with mohri, jeera, hing and haldi. Then fry the kadhipatta leaves and the cashews for a minute. Next, fry the tondli/tindora in the fodni for a minute or so and then add the washed rice to it. Fry the rice a little and then add water. Mix in the chilli paste, kaala masala and salt. Check for taste. A useful tip in deciding whether the spices are right, is that, the color of the water should be dark brown, and when tasting the water it should be a little strong and salty than what you normally would have. Once the taste is right, close the lid of the cooker and cook for 2 whistles. If not using pressure cooker, just cover the pan with a lid and cook until rice is cooked. Garnish with grated coconut and cilantro and serve hot with a dollop of ghee.
 Variations:
- Use green capsicum instead of tondli.
- Small eggplants are also quartered and used sometimes.
- Even a mix of veggies can be used.
- To add more flavor, make paste of ginger, garlic, green chillies and cilantro and add to the rice.
My entry for Nupur's 'Q of Indian Vegetables' is 'Quick Tomato Saar'. Tomato Saar is a very popular, Maharashtrian version of a soup. It is commonly found on the menu of engagement functions, weddings, naming ceremonies, etc. Normally, meals on auspicious/festival days are prepared sans onion and garlic and hence, Tomato Saar is an all time favorite on such days. This sweet & sour soup is generally served along with the very traditional 'Masaale Bhaat' or Pulav and is a crowd pleaser. So, the next time you have an impromptu potluck or if you are craving for something simple and quick, try out this appetizing 'Quick Tomato Saar'.
The traditional way of making the Saar involves cooking the tomatoes, cooling them, then running the tomatoes through the food processor and straining out the seeds...whew!! It could take a while to get the tomatoes prepared; and though I do go the traditional way, when I am tired and hungry, I just don't have the patience. So this is where the 'quick' part comes in...
Instead of using fresh tomatoes I use 'Campbell's Low Sodium Tomato Soup' ! It makes life really easy and lunch/dinner really 'Quick'!! :)
Ingredients: (serves 2)
Campbell's Tomato soup-Low sodium 1 small can
Water 1 cup
Cayenne pepper 1-2 tbsp (adjust to your liking)
Sugar 2 tsp
Salt as per taste
To garnish:
Saajuk tup/ghee (clarified butter) about 1 tsp
Jeera (Cumin seeds) 1 tsp
Hing powder (Asefoetida) 1/2 tsp
Grated coconut about 2 tbsp
Cilantro
Method:
Empty the can of soup in a saucepan. Mix in the water to thin it out. Tomato saar is generally not very thick. Next, add the cayenne pepper, sugar and salt. Heat the saar and bring to a boil. Check for taste. You should get a sweet & sour taste.
In a separate small kadhai, heat the ghee(tup) to make the fodni/tadka. To this add the jeera and the hing powder. Pour this over the Tomato Saar. Garnish with grated coconut (I use frozen coconut) and cilantro. Serve hot.
Now wasn't that quick? ;)
 We had the Tomato Saar with 'Masaale Bhaat', of which I will write in my next post.
Variations:
- You can replace the sugar with gul (jaggery). Also, in this case, do not add cayenne pepper. Add coarsely crushed black peppercorns instead, to the fodni (tadka). This is how my mother-in-law prepares it.
- Instead of using grated coconut, use coconut milk. It gives a creamy texture to the Saar.
 Yesterday, 14th May, was my hubby, S's, birthday. This was the perfect occasion for me to try out the Pineapple-Pecan Upside Down cake, for which both S and me were craving for a long time. Actually, it was S who first came across this recipe on Trupti's 'The Spice Who Loved Me'. Since then he has been asking me to try it out, but, for some reason or the other it never happened. Finally, yesterday I decided to surprise S with this deliciously mouth-watering cake which was originally posted by Burekaboy of 'Is-that-my-bureka?'. This is my entry for Coffee's MBP: Something Sweet.
I just made one change to the recipe...instead of using 1/2 cup AP flour + 1/2 cup cake flour, I used 1/2 cup AP flour + 1/2 cup whole wheat flour (atta).
The result was mind-blowing and the whole wheat flour worked very well in the recipe! This cake is soooooooo delicious that I had a tough time waiting for S to get back from work and cut the cake before I could eat it.
Awesome!!!

Friday is already here and I realized that I still haven't sent in my entry for 'P of Indian Vegetables'. I had planned for this recipe a long time back but I had a hectic week, with my hubby traveling, and me being invited for lunches & dinners by my friends...so I had absolutely no reason or inspiration to cook :) I must say I got really pampered with all my friends insisting that I take a break and not cook anything. Lucky me!!! Finally, today morning I decided to try out my recipe and take it for lunch to another friend's place.
The first thing that I think of when I think of the letter 'P' is 'Paalak' (Spinach in English). Nutritionists believe that 'Paalak' is a rich source for iron and vitamins A, C, & E and several antioxidants; hence an absolute essential food in our daily diet. Both my hubby and me love it!! Its a regular in our house. When I was growing up, my parents never ceased to explain the importance of including green leafy vegetables in our diet, and no excuse was ever acceptable for not eating it. But the reason that convinced me the most as a kid was that I would get those envied pink cheeks... :)
So without further rambling I would like to introduce my recipe for 'P of Indian Vegetables'--Paalak Dahiwade (Spinach dumplings in yogurt sauce)! 'Dahi' is the word for yogurt in Marathi/Hindi and 'wade' means round flat dumplings. This is a very easy recipe and something different when you are tired of eating the regular dahiwade(Urad dal dumplings in yogurt sauce). 'Dahiwade' is the perfect recipe for those hot summer afternoons when you don't want to eat a lot of spicy masala dishes. My parents have lived in Madhya Pradesh for many years and this is where my mom learnt this recipe. It goes very well as a side dish or as a snack and is best served chilled. So, with the temperatures soaring, I thought of kick starting my summer with a generous serving of chilled 'Paalak Dahiwade'.
Ingredients:
To make the Wade: (makes about 12 medium sized wade)
Chopped paalak (fresh/frozen) 2 cups
Besan (chickpea flour) about 10 spoonfuls
Cayenne pepper about 2 tbsp
Salt as per taste
A pinch of baking soda (optional)
Oil to fry
To make the Dahi:
Plain dahi (yogurt) about 4-5 tbsp
Water to thin out the dahi
Ginger & green chilli paste about 1 tsp
Sugar 1-2 tsp depending on how sour the yogurt is
Salt as per taste
To Garnish:
Jeera (Cumin) powder
Cayenne pepper
Imli (Tamarind) chutney
Cilantro
Method:
To make the dahi, beat the dahi (yogurt) till it's smooth and lump-free. Then add water to it until you get a sauce like consistency. If by mistake you add too much water, just add a little more dahi to it and mix it in. Next add salt, sugar and ginger-chilli paste to it. Mix well and check for taste. Keep aside.
 The next step is to make the 'wade'. Take the spinach, wash it and chop it finely. If using frozen spinach, thaw it and squeeze out the excess water. To the chopped spinach add salt, cayenne pepper and soda. Next, mix in the besan so as to make a batter. Do not add water while doing this otherwise the mixture will get too watery. The moisture in the washed spinach is enough to make the batter. The batter should be of a consistency where you can make flat balls out of it and fry them in oil. Heat oil in a pan/kadhai. Once the oil is heated, make round flat balls and fry them until they turn golden brown. Remove and drain excess oil by placing them on a tissue paper.
 Make sure to fry the wade immediately after the batter is ready, otherwise, it will get watery.
The final step involves the soaking of the 'wade' in the 'dahi'. Place the wade in a bowl and pour the prepared dahi over them. Make sure that all the wade are covered with the dahi. Cover it and put it in the refrigerator for 2-3 hours at least till the wade soak in the dahi completely. The longer you keep them the better they will absorb the dahi. It can also be done overnight.
 To serve the 'Paalak Dahiwade', sprinkle a little bit of cumin powder and cayenne pepper over them, drizzle some tamarind chutney on top, garnish with some cilantro and just chill!
 Note: If you think that all the dahi has been absorbed into the wade, then just make some more before serving and pour over individual bowls.
Its a month now since my first post and I am really glad that I started my own blog! I am grateful to fellow-bloggers for their encouragement & appreciation! Since I started my blog with a Maharashtrian dish and its been a while since I posted one, I thought that this was a perfect occasion to share another of my favorite. The recipe that I am sharing today, was one of my preferred foods as a kid when my liking towards vegetables was limited. Whenever my mom asked me what I wanted for lunch/dinner, I would promptly reply, 'Varanphala'! This recipe uses the maharashtrian kaala masala and it is the ultimate one pot comfort food!
Varanphala, or 'Brown Pasta Sauce', as my 4 year old nephew calls it, is made using whole wheat flour and cooked toor(tuvar/arhar/yellow lentils) dal. 'Varan' means cooked toor dal in marathi and 'phala' which means fruit, refers to the diamond shaped pasta made from whole wheat dough that are cooked in the dal. Varanphala is pretty simple to make and ideal for days when you have run out of groceries. It can be served as brunch, lunch or even dinner. It is also popular in Gujarati cuisine and is called 'Dal Dhokli'. The way in which it is made can differ from family to family but the taste is always equally good and comforting. I have two different styles of making varanphala...one being my mother-in-law's recipe and the other being my mom's. Recently I had varanphala at a friend's place and she had a completely different way of making it, though equally delicious! I am going to list all 3 styles in this post and I hope everyone finds their favorite!
Ingredients:(serves 2)
To make the Varan:
Cooked toor dal 1 cupKadhipatta leaves (curry leaves) 2-3Tamarind pulp about 2-3 tbsp(readymade or homemade)
Gul (jaggery) 3-4 tbsp
Mohri (mustard seeds) 1 tsp
Jeera (cumin seeds) 1 tsp
Hing 1/2 tsp
Haldi (turmeric powder) 1 tsp
Lal mirchi powder (Cayenne pepper) 1-2 tsp
Kaala masala 2 tsp
Oil 1 tbsp
Water about a cup or two
Note: To make the tamarind pulp at home, soak dried tamarind (about the size of a ping-pong ball) in about 1/2 cup water for about an hour. Before using, squeeze out the pulp from the tamarind into the water and use the water to season any dish.
To make the Phala:
Whole wheat flour (atta) 1 cup
Water to make the dough
Salt 1/4 tsp
Cayenne pepper 1/4 tsp
Ajwain (Carom seeds) 1/4 tsp
Method :
First step to make varanphala is to cook the toor/tuvar dal. Wash the dal and add about 1&1/2 cup water and 1/2 a tsp of haldi and cook in pressure cooker for upto 3 whistles. While the dal is cooking, prepare the dough for the 'phala'. Take the atta, add salt, cayenne pepper and ajwain and then knead the dough as you would to make chapatis. Keep aside.
Once the dal is cooked and out of the pressure cooker, heat the oil in a kadhai. Add the mustard seeds. Once the seeds start crackling, add the cumin seeds, hing and haldi powder. Next, add the curry leaves and then mix in the cooked dal. Pour some water to thin it out a little. Season the dal with salt, cayenne pepper, kaala masala, tamarind pulp and jaggery. The taste of this varan should be sweet & sour. A variation to this would be to add more jaggery than tamarind pulp or vice-versa. The jaggery can also be skipped totally. Make sure that you add adequate water to the dal as the 'phala' or pasta has to be cooked in it. Taste the dal and adjust seasoning. Bring to a boil and then reduce the heat and let simmer. The varan should look like this..
 The next step is to make the 'phala'. Take a small ball of the dough, like so...
 Roll out a thin chapati out of it, like this...
 Now take a knife and cut into diamond shape as follows...
 Add these to the simmering dal, cover and cook for about 5 mins.
 'Varanphala' is ready to eat once white steam starts escaping the covered kadhai. Be sure to enjoy it hot with a dollop of ghee. Varanphala starts to thicken as it gets cold so make sure to eat it hot!
 Variations to make the 'Varanphala':
Instead of adding cayenne pepper and ajwain, make the dough using jaggery water. For this, simply soak about 2 tbsp jaggery in some water and use this water to knead the dough.The procedure for making the varan is same.
The other variation is to omit the jaggery in the dal and instead, add a paste of dried coconut and cumin seeds. The 'phala' are made using the ingredients listed above.
Also, instead of using just toor dal, you can use a mixture of dals. Take equal quantities of toor, chana, split moong(yellow), and split masoor( pink in colour) dals and cook together in pressure cooker.
 Grind to a fine paste in a blender/food processor. Remove the spices that are difficult to grind. Mix remaining onion (chopped finely) and cilantro. Check for taste. Add a little cayenne pepper if its not spicy enough. Mix well and then make small flat patties. These can then either be deep fried in oil or baked in the oven. I generally bake them in a preheated 375 degrees oven till they are golden brown (this can take a while, say 40 mins). Serve with mint chutney.
 (This picture was taken in hurry and hence not great, but I assure you the recipe is very good and it looks better than in this picture...)


