I must confess that I am not very imaginative when it comes to eggplants. So, when Sangeeta of 'Ghar Ka Khana' announced the JFI ingredient for the month of July -- Eggplants, I thought that I will take this up as an occasion to try out something new. But the problem is, I am not too adventurous when it comes to eating eggplants. So, even though I came across some really good recipes, I decided to settle for the tried and tested 'Bharli Vaangi' that my MIL makes. This is a typical Maharashtrian way of making this dish with just a little variation, and goes great with poli (chapati), bhakri (jowar roti), or rice. As far as my experimentation with eggplant goes, I have bookmarked several recipes and I AM going to try them out ! :)
 Ingredients:(serves 2)
Small eggplants 4
Minced or finely chopped onion 1/2
Daanyacha koot (Roasted peanut powder) 3/4 cup
Tilacha koot (Roasted sesame powder) 1/4 cup (optional)
Minced ginger 1 tsp
Minced garlic clove 1
Gul (jaggery) 1 tsp
Goda masala 2 tsp
Cayenne pepper 1/2 tsp or to taste
Salt
Mohri (mustard seeds) 1/2 tsp
Jeere (cumin seeds) 1/2 tsp
Hing 1/4 tsp
Halad (turmeric) 1/4 tsp
Oil 2 tbsp
Method:
 The first step to making Bharli Vaangi is to make the masala to be stuffed in the vaangi. In a plate or bowl, mix together the peanut powder, sesame powder (if using), minced ginger, minced garlic, goda masala, cayenne pepper, halad and salt.
Next, make 4 vertical slits in each eggplant. Do not cut through the entire eggplant. Now stuff each eggplant with the above prepared masala. Keep aside.
In a kadhai or pan, heat the oil. To the heated oil, add mohri, jeere, hinga and a pinch of halad to make the fodni (tadka). Next, add the minced onion (I prefer minced onions because they give a good consistency to the gravy). Fry the onions till they brown. The browning of the onion lends a beautiful color to the dish (this is my variation to the dish). Now, add the stuffed eggplants to this and cook them for a minute or two.
 Flip them and cook on the other side as well. Do not add water to this. Instead, cover the kadhai with a plate and on top of the plate, keep a vessel full of water, like this...
 You can also put water on the plate itself. This is how my Mom and my MIL cook the eggplants. After a few minutes remove the plate and add a little bit of the water that was on the plate. Adding the warm water kept on the plate, reduces the chances of getting wrinkled eggplants. Also mix in the extra masala if any. At this point add the jaggery. Continue to cook covered with water on top. Check every few minutes and keep adding the warm water if needed. Once the eggplants are cooked, remove the covered plate, and adjust the consistency of the gravy. Check for seasoning and adjust if necessary. Garnish with cilantro and serve hot.

This is the first time that I am participating in the Weekend Breakfast Blogging event started by Nandita of Saffron Trail fame. This month's WBB is hosted by Trupti of The Spice Who Loved Me and her theme is: Spice It Up!
 Weekend breakfast is a festive event. Normally, during the week, my husband and me survive on cereal for breakfast, but weekends I like to have something different. Then again, how many times can one make the traditional 'Upma' and 'Pohe'. I know, I know, I can be really difficult at times...and I am sure my husband will agree on this ;) So 'moong dal chile' is one recipe that takes no time at all to make, is healthy because it does not involve even a drop of oil, and tasty at the same time; as everyone is aware, moong dal itself is easy to digest, so you don't have to feel guilty of having one extra... You can easily increase the quantity of the batter depending on the number of people. I have picked up this recipe from my mom, who I think got it from one of her North Indian friends. Enjoy!
Ingredients:(makes about 8-10 Chile)
Moong dal (split yellow or whole green) 1 cup
Water about 1/2 cup
Grated ginger or paste 1 tsp
Green chilli paste 1 tsp (adjust according to how hot the chillies are)
Chopped Cilantro
Salt
Method:
Soak the moong dal in water for 30 minutes. You can use either the split yellow dal or the whole green ones for this. I have used the yellow dal this time. While the dal is soaking, make the ginger-chilli paste, have some tea, check your mails or just laze around...:) Once the dal has been soaked in water, grind it into a fine batter along with some water. Add the ginger-chilli paste, chopped cilantro and salt. Taste the batter and adjust for seasoning. The consistency of the batter should be like that as of a dosa.
Now heat a nonstick tawa. Once the tawa is hot, spread the batter just as you would when making a dosa. There is no need to put any oil on this. Once done the moong dal chile will start coming off from the side. Flip it and cook on the other side. Serve hot with a dollop of plain unsalted butter. For those who do not want to ruin this healthy, non-greasy breakfast, just enjoy the chile with some ketchup or chutney of your choice (green chutney or regular idly chutney would also go well with this). This can easily be served as brunch or a snack when you have unexpected guests.

Weekends at our place are so lazy...by the time we wake up and make our weekly calls back home, we have missed breakfast time and close to lunch. On top of that, many a times we have run out of veggies but have leftover polis (chapatis). So this is the perfect occasion for another of our childhood favourites---'Phodnichi Poli' or 'Policha Kuskara' as some people call it. This is a very good way to use leftover, stale polis and a great option for breakfast or for a quick snack in between. As a kid I used to plead my mom to make this dish whenever there were some extra chapatis. Of course, my wish was not always granted, but whenever my mom did make this dish, it was a real treat for me. You will not find any Maharashtrian kid who has not heard of this dish and hence this recipe is going for the RCI-Maharashtrian Cuisine event, hosted by Nupur of 'One Hot Stove'.
 Ingredients: (serves 2)
Leftover poli 4
Chopped onion 1 medium or 1/2 big
Kadhipatta (Curry) leaves 2-3
Daane (Peanuts) optional 1tsp
Sugar 1/2 tsp
Cayenne pepper 1 tsp
Salt
Mohri (mustard seeds) 1/4 tsp
Jeera (Cumin seeds) 1/4 tsp
Hing (Asafoetida) 1/4 tsp
Halad (Turmeric) 1/2 tsp
Oil for phodni (tadka) 1 tbsp
Method:
Tear the poli (chapati) very fine and crumble it (we call it 'kuskara karne'). This can be done in two ways. Either tear the poli into big pieces, and run them in the food processor till you get really tiny pieces of poli; or just keep rubbing the pieces of poli between your palms to crumble it into tiny pieces. The tinier the pieces the better. Once done, sprinkle sugar, cayenne pepper and salt on this. It will look like this...
 Now heat the oil in a kadhai. Once heated add the mohri, jeere, hing and halad to make the phodni (tadka). To this add the kadhipatta leaves. Fry for a minute and then add the chopped onions. Fry till they turn translucent. Next, add the peanuts if using. Fry a little and then add the poli mixture. Mix together, check for taste. Cook covered for a minute or so. Do not cook for a long time otherwise it will turn tough. Garnish with some cilantro and serve with a dollop of dahi (plain yogurt).

'Mattha' brings back a lot of memories...all the weddings that I attended over the years, always curious to know what the menu would be, and hoping that it were a traditional Maharashtrian fare, mainly for two main reasons; the first one, that the sweet dish would be 'Jilbi' (Jalebei) and the second being, there would be several 'vaatis' (katori/bowl) of 'Mattha' to wash down the heavy and spicy meal! And then of course, there would be 'Masaale bhaat', 'Aluchi paatal bhaaji' (Patra leaves curry), 'Varan-bhaat', 'Hirvi chutney'...ok, I think, that makes it more than two reasons :)
'Mattha' is basically buttermilk with the addition of certain condiments. On hot summer days, as well as any other day, my mom would churn out fresh buttermilk, which we call 'taak' in Marathi, from 'saayicha dahi' (yogurt made from cream)-- the source for 'loni' (butter) or from regular 'dahi' (yogurt). We used to have 'taak' for lunch or sometimes even at teatime, when it was too hot to drink a cup of tea. This 'taak' used to be flavored with different spices and condiments like cumin powder, hing (asafoetida), at times, both, and sometimes a little ginger and at other times, just salt and a little sugar. And then there was 'Mattha', my favorite version of 'taak', which has a certain combo of condiments added to it. Thus, a typical Maharashtrian meal will always include 'taak' or 'mattha' at the end, whether it is a festive one or just a regular meal.
The 'Taak' that I used to have back at home, in India, was so rich and creamy because of its source-- Buffalo's milk! Unfortunately, there is no 'buffalo milk' here in the US, so we resort to the ready made store-bought buttermilk, which comes from cow's milk. Furthermore, this buttermilk is generally cultured buttermilk, which means that bacteria is added to milk to make it. It does not come out of the churning process that is used to make butter; hence the taste and texture don't match up to homemade buttermilk. The sacrifices one makes after coming here.... :( On the positive side, though, 'taak' or buttermilk, whether cultured or homemade, from cow's milk or buffalo milk, is said to have a cooling effect on the body. It also helps in digestion of food and hence, normally consumed at the end of the meal. I once read an article which said the benefits of buttermilk are so many, that Ayurveda prescribes buttermilk over yogurt! So drink away...
Coming back to 'Mattha', it is easy to make, very soothing and very Maharashtrian! I always have buttermilk at hand and summer lunches are never complete without this chilled and spiced up cooler. Since this is a maharashtrian recipe, it is going straight to Nupur for the RCI-Maharashtrian cuisine event. Enough said, now lets get to the recipe...
Ingredients:(the measures given here are just to give an estimate)
Buttermilk 2 cups
Ginger paste 1/2 tsp
Green chilli paste 1/2 tsp (adjust according to the spiciness of the chilli)
Sugar 1-2 tsp (depending on how sour the buttermilk is)
Salt
Cilantro
Method:
Pour the buttermilk from the can into a bowl. If you are using store-bought buttermilk, add a little water to thin it out. Buttermilk can also be prepared at home from yogurt. For a rich and creamy taste, use full fat yogurt.
To the buttermilk, add the ginger-chilli paste, sugar, and salt. Mix well and check the taste. It should not be too spicy or too sour. The right flavor is, sweet with a hint of spiciness from the ginger & chilli and a little sourness from the buttermilk itself. Garnish with chopped cilantro. 'Mattha' is ready to be served.

I had planned to make this bhaaji at the start of the week, but somehow it got postponed till today. Meanwhile, I saw other recipes with 'tondli' (Tindora/Ivy gourd) being posted for the 'T' of Indian Vegetables, hosted by Nupur of 'One Hot Stove', and added them to my already long list of bookmarked recipes. I did have two other 'T' recipes that did not invlove 'tondli', but then decided to go with the flow... :) So here I go with my tondli recipe for this week's 'T' of Indian Vegetables.
I have learnt this recipe from my mother-in-law and it has become my favourite ever since. This bhaaji is easy to make and extremely delicious! You can use fresh or frozen tondli for this recipe. This time I got really good, fresh tondli but I am not always lucky...so, on such occasions I turn to frozen tondli and it works just fine.
Ingredients: (serves 2)
Chopped Tondli 2 cups
Besan (Chickpea flour) 3 tbsp
Daanyacha koot (roasted peanut powder) 1tsp
Lemon juice 1tsp
Mohri (mustard seeds) 1/2 tsp
Jeere (Cumin seeds) 1/2 tsp
Hing 1/4 tsp
Haldi (turmeric powder) 1/2 tsp
Oil 1 tbsp
Cayenne pepper 1-2 tsp (according to taste)
Salt
Method:
Wash and then chop the tondli either into small round slices or lengthwise. In a kadhai, heat the oil, then add mohri, jeere, hing and halad to make a fodni (tadka). Then, to this, add the chopped tondli. Let the tondli cook. Do not add water or it will get too soggy. Sprinkle a little salt while cooking, which will bring out the moisture from the tondli. Cover to help cook faster and keep stirring frequently. Once the tondli is cooked, sprinkle the besan over it and mix. Pour a little water (about 1 tsp) over the bhaaji, add cayenne pepper and salt, then cover and cook for a minute or two. Then add the peanut powder and lemon juice. Mix well and garnish with cilantro.

I am back with yet another entry for the RCI- Maharashtrian Cuisine event for this month, hosted by none other than our very own, Nupur of 'One Hot Stove'. Today's post is more of a technique, rather than a recipe, which I think (I hope I am right!) is unique to Maharashtrians.
We are all familiar with the Indian bread, popularly known as 'Roti/Chapati'. Well, I am sharing my way of making this roti which is called 'Ghadichi Poli' in Marathi. So what is the difference? The difference lies in the name itself...'ghadi' means 'fold', and so 'ghadichi poli' means folded roti. This technique is similar to that of making parathas, with the exception that parathas are thicker while poli is thinner. The folds in the poli are revealed as 'padar' (layers-for lack of a better word), once it puffs up and cooks. Experts like my MIL and my mom can manage upto 4 'padar' to their poli! The philosophy here is, the more 'padar' to your poli, the better ! :)
My mom always made 'ghadichi poli' and whenever I used to get a chance, I used to grab a hot poli right off the tava (griddle), apply some homemade tup (ghee), roll it up and eat it! Even my MIL makes polis this way and so, both my husband and me, are addicted to ghadichi poli. I have often heard my friends complaining that it is very difficult to make ghadichi poli, and so they normally opt for regular rotis/phulkas. But trust me on this, making ghadichi poli is no more difficult than making a regular roti/phulka. The part which makes people shy away from ghadichi poli, I think, is the ability to make a round poli from a triangle; but with a little practice, and patience, this can be achieved. Before you know it, you will be able to roll out round, thin and soft polis, in no time!

Ingredients: (makes 7-8 polis)
Kanik (atta) 1 1/2 cups (I use Sujata Atta)
Water to knead the dough
A little salt
Oil
Method:
Knead the dough as you would for a regular roti/chapati by hand or in the food processor. Nupur of 'One Hot Stove' has described this process very well here. The dough should be soft and a little elastic. Once the dough is ready, cover it and let it sit for at least 30 minutes. Once you are ready to make the poli, apply a few drops of oil to the dough and knead it again.
 Before you start rolling out your poli, make sure that you start heating the tava (griddle). It should be neither too hot nor too cold.
Now, take a small ball of dough like so,
 Roll it out like this,
 The next step is to apply 1-2 drops of oil on the rolled out poli, and then to fold it into half to form a semicircle, like this...
 Apply a drop or two of oil on the surface again and then fold it, to form a triangle like this,
 Now, apply a little flour to it like so...
 Start rolling out the poli,
 To ensure that the poli is round, roll on the edges and keep turning the poli frequently. I have found that it is easier to make a triangular poli round when it is smaller in size.
 Now keep rolling the poli on the edges, turning it as you roll, to increase its diameter. Avoid rolling too much at the center of the poli, otherwise it will become too thin at the center and will turn out like a papad. The trick is to keep it thick in the middle and thin at the edges. Apply some flour if it starts sticking to the polpat (platform).
Your poli should look like this,
 Transfer the poli onto the tava and cook. Keep flipping to cook on both sides.
 Pressing with the end of the rolling pin sometimes helps the poli to puff up...
 like so,
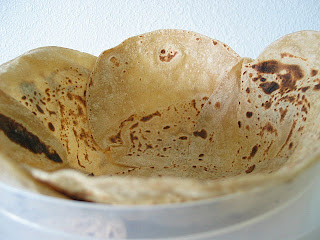
 and finally, your poli is ready !
 Enjoy hot with homemade tup (ghee) and any bhaaji (curry) of your choice! These polis will stay soft till evening and even the next day, so no worries :)
 (A big thanks goes to my hubby dearest for patiently clicking these pictures while I made the 'poli')
Today I decided to share the recipe of a major ingredient used in Maharashtrian cooking--'Goda Masala'. It is the base for most Maharashtrian curries and dals (called aamti in Marathi).To make goda masala the spices are roasted using oil. All spices are roasted till they become darker in colour and then ground to a powder. When the spices are roasted enough for them to be dark brown (almost black) in colour when ground, it is called 'Kaala Masala'. 'Kaala' means black in Marathi, and hence the name. The difference between 'Kaala Masala' and 'Goda Masala' is due to the proportions of certain spices and the degree to which they are toasted. The recipe and name for this masala can vary from family to family but, the basic ingredients or the flavor will never change drastically. Every time I go to my hometown in India I get a full year's supply of homemade masala from my mother-in-law as well as my mother. It is very easy to make, it can be stored for several months, and the most important thing....a little goes a long way!
Ingredients:
Dhane (Coriander seeds) 1 cup
Jeere (Cumin seeds) 1/4 cup
Teel (White Sesame seeds) 1/3 cup
Lavang (Cloves) 2 tbsp
Badi Elaichi (Big Cardamom) 2 tbsp
Dalchini (Cinnamon sticks) 2 tbsp
Kaale Mire (Black peppercorns)2 tbsp
Dagadphool (Lichen) 2 tbsp (skip it, if unavailable)
Tamalpatra (Bay leaf) 1/2 cup
Oil to roast the spices about 1-2 tsp
Method:
In a pan or kadhai, heat the oil and roast all the spices together till they turn dark in color.The color should be a very dark brown in order to get a good color to the masala. Make sure to keep stirring to avoid burnt spices.Once roasted, let cool and then pass through a grinder to make a powder.
This is how the masala will look when its ready....

Update:
There has been a lot of confusion regarding kaala masala/goda masala, so I tried to find out more on this. According to my research, the proportion of coriander seeds, cumin seeds, elaichi, and dalchini (garam masala ingredients) is more in kaala masala and that generally, dried coconut (khobra) & sesame seeds are not used. Also, the spices are toasted to a more darker colour to make Kaala masala. Hence, goda masala is slightly lighter in colour than kaala masala. Again, this may vary family to family. My mom's recipe of Goda masala skips the dried coconut only because, coconut starts giving out an oily smell if kept for too long.
I have modified my post accordingly and I hope this will clear some of the confusion created by my post.
Sabudana Wada is my all-time favourite Maharashtrian dish! In Pune (Maharashtra), there are a lot of places where you get hot, delicious Sabudana Wada. It is very easy to prepare and requires very little preparation. Sabudana (Sago in English), is normally associated with fasting, and so naturally, Sabudana wada is popular on such days. But any other day is just as good to enjoy this comforting food. In fact, as far as I remember, I have never made it during a fast...but then I don't even remember the last time I kept a fast ;). Anyhoo, just go ahead and try out this recipe when you are bored of the same old, same old, and I guarantee that you won't be disappointed.
This is my entry for Nupur's 'S' of Indian Vegetables (I hope she will accept this one as there really aren't that many veggies in here). Since this is a Maharashtrian recipe, this is also going for RCI- Maharashtrian Cuisine.
 Ingredients: (makes about 20 wadas)
Sabudana (soaked in water for at least 5-6 hours) 1cup
Boiled Potatoes 1 medium
Daanyacha koot (roasted peanut powder) 2 tbsp
Cilantro chopped 1 tsp
Cayenne pepper 2-3 tsp (as per taste)
Salt
Oil for frying
Method:
To make Sabudana wadas, it is extremely important that the sabudana is soaked properly (at least 5-6 hours) in water. Rinse the sabudana in water and leave water just enough to cover. Once soaked, the sabudana will puff up and be soft to touch.
Boil 1 medium sized potato. Mash it and add to the soaked sabudana. Add roasted peanut powder, cayenne pepper, salt and chopped cilantro and mix together. You can also use green chillies instead of cayenne pepper. Check for taste. Now, make small flat patties and fry in oil till golden brown. Serve hot with green chutney.
 To make green chutney:
Grind together green chillies, lots of cilantro, a tsp or two of roasted peanuts and 1 tsp of jeera. Add salt and a little plain yogurt and serve.
 Ingredients:(serves 2)
 The first step to making Bharli Vaangi is to make the masala to be stuffed in the vaangi. In a plate or bowl, mix together the peanut powder, sesame powder (if using), minced ginger, minced garlic, goda masala, cayenne pepper, halad and salt.
  Flip them and cook on the other side as well. Do not add water to this. Instead, cover the kadhai with a plate and on top of the plate, keep a vessel full of water, like this...
 You can also put water on the plate itself. This is how my Mom and my MIL cook the eggplants. After a few minutes remove the plate and add a little bit of the water that was on the plate. Adding the warm water kept on the plate, reduces the chances of getting wrinkled eggplants. Also mix in the extra masala if any. At this point add the jaggery. Continue to cook covered with water on top. Check every few minutes and keep adding the warm water if needed. Once the eggplants are cooked, remove the covered plate, and adjust the consistency of the gravy. Check for seasoning and adjust if necessary. Garnish with cilantro and serve hot.


