'Phodnichya Mirchya' is a Maharashtrian side dish, served on the left side of the plate. 'Phodni' means 'Tadka' and 'Mirchya' means 'Chillies'. So basically, its a simple stir fry recipe with loads of flavor. Although, looking at the recipe might make you think that it will be very hot, but if you choose the right kind of chillies, you won't feel a thing, I promise. I am sure of this because my hubby too is scared of eating hot stuff, so I cannot afford to make things extra hot :).
This is a recipe that has been passed down from my grandmother (maternal) to my mom, and from her to me. This can be made in two ways, the first one is, with potatoes and the other way is using just green chillies. It tastes great with Rice and dal or curd rice and even with chapatis. This is my entry for JFI--Chillies, hosted by Nandita of Saffron Trail, originally started by Indira.
 Ingredients:
7 green chillies chopped into small pieces
1/2 a medium sized potato, thinly sliced into small triangular pieces (optional)
3 tsp daanyacha koot (roasted peanut powder)1 tsp grated coconut (fresh or dried) (optional)
1/2 tsp mohri (mustard seeds)
1/2 tsp jeere (cumin seeds)
1/4 tsp hing (asafoetida)
1/2 tsp halad (turmeric)
1 tbsp oil for phodni (tadka)
Method:
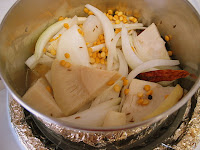
Choose fresh green chillies that are thick and long. These chillies are generally not that hot. If you go with small, slender chillies, the dish will become too hot (like Thai chillies). Now chop these chillies into small pieces. Next, peel the potato and make small, thin triangular pieces like this,
 Normally, the chillies and potato should be in equal proportion, but today, I have used a little more potato than usual. You can also skip the potato entirely and make this with chillies only. It tastes amazing!
 Now, in a pan, heat the oil and then add the mustard seeds. Once they start popping, add the cumin seeds. Let them sizzle and then add the hing and halad. Now throw in the sliced potato and the chillies in the pan. Let them cook and turn a little golden brown. Keep stirring. The chillies should become slightly crunchy. Once that is done, the next step is to mix in the roasted peanut powder and grated coconut (if using). Add some salt and mix well. Take it off from the heat and store in a clean container. This lasts for upto 4-5 days in the fridge. Enjoy it with your lunch or dinner alongside your favorite veggie, and pretty soon you will get hooked on to it!

'Mattha' brings back a lot of memories...all the weddings that I attended over the years, always curious to know what the menu would be, and hoping that it were a traditional Maharashtrian fare, mainly for two main reasons; the first one, that the sweet dish would be 'Jilbi' (Jalebei) and the second being, there would be several 'vaatis' (katori/bowl) of 'Mattha' to wash down the heavy and spicy meal! And then of course, there would be 'Masaale bhaat', 'Aluchi paatal bhaaji' (Patra leaves curry), 'Varan-bhaat', 'Hirvi chutney'...ok, I think, that makes it more than two reasons :)
'Mattha' is basically buttermilk with the addition of certain condiments. On hot summer days, as well as any other day, my mom would churn out fresh buttermilk, which we call 'taak' in Marathi, from 'saayicha dahi' (yogurt made from cream)-- the source for 'loni' (butter) or from regular 'dahi' (yogurt). We used to have 'taak' for lunch or sometimes even at teatime, when it was too hot to drink a cup of tea. This 'taak' used to be flavored with different spices and condiments like cumin powder, hing (asafoetida), at times, both, and sometimes a little ginger and at other times, just salt and a little sugar. And then there was 'Mattha', my favorite version of 'taak', which has a certain combo of condiments added to it. Thus, a typical Maharashtrian meal will always include 'taak' or 'mattha' at the end, whether it is a festive one or just a regular meal.
The 'Taak' that I used to have back at home, in India, was so rich and creamy because of its source-- Buffalo's milk! Unfortunately, there is no 'buffalo milk' here in the US, so we resort to the ready made store-bought buttermilk, which comes from cow's milk. Furthermore, this buttermilk is generally cultured buttermilk, which means that bacteria is added to milk to make it. It does not come out of the churning process that is used to make butter; hence the taste and texture don't match up to homemade buttermilk. The sacrifices one makes after coming here.... :( On the positive side, though, 'taak' or buttermilk, whether cultured or homemade, from cow's milk or buffalo milk, is said to have a cooling effect on the body. It also helps in digestion of food and hence, normally consumed at the end of the meal. I once read an article which said the benefits of buttermilk are so many, that Ayurveda prescribes buttermilk over yogurt! So drink away...
Coming back to 'Mattha', it is easy to make, very soothing and very Maharashtrian! I always have buttermilk at hand and summer lunches are never complete without this chilled and spiced up cooler. Since this is a maharashtrian recipe, it is going straight to Nupur for the RCI-Maharashtrian cuisine event. Enough said, now lets get to the recipe...
Ingredients:(the measures given here are just to give an estimate)
Buttermilk 2 cups
Ginger paste 1/2 tsp
Green chilli paste 1/2 tsp (adjust according to the spiciness of the chilli)
Sugar 1-2 tsp (depending on how sour the buttermilk is)
Salt
Cilantro
Method:
Pour the buttermilk from the can into a bowl. If you are using store-bought buttermilk, add a little water to thin it out. Buttermilk can also be prepared at home from yogurt. For a rich and creamy taste, use full fat yogurt.
To the buttermilk, add the ginger-chilli paste, sugar, and salt. Mix well and check the taste. It should not be too spicy or too sour. The right flavor is, sweet with a hint of spiciness from the ginger & chilli and a little sourness from the buttermilk itself. Garnish with chopped cilantro. 'Mattha' is ready to be served.

Sabudana Wada is my all-time favourite Maharashtrian dish! In Pune (Maharashtra), there are a lot of places where you get hot, delicious Sabudana Wada. It is very easy to prepare and requires very little preparation. Sabudana (Sago in English), is normally associated with fasting, and so naturally, Sabudana wada is popular on such days. But any other day is just as good to enjoy this comforting food. In fact, as far as I remember, I have never made it during a fast...but then I don't even remember the last time I kept a fast ;). Anyhoo, just go ahead and try out this recipe when you are bored of the same old, same old, and I guarantee that you won't be disappointed.
This is my entry for Nupur's 'S' of Indian Vegetables (I hope she will accept this one as there really aren't that many veggies in here). Since this is a Maharashtrian recipe, this is also going for RCI- Maharashtrian Cuisine.
 Ingredients: (makes about 20 wadas)
Sabudana (soaked in water for at least 5-6 hours) 1cup
Boiled Potatoes 1 medium
Daanyacha koot (roasted peanut powder) 2 tbsp
Cilantro chopped 1 tsp
Cayenne pepper 2-3 tsp (as per taste)
Salt
Oil for frying
Method:
To make Sabudana wadas, it is extremely important that the sabudana is soaked properly (at least 5-6 hours) in water. Rinse the sabudana in water and leave water just enough to cover. Once soaked, the sabudana will puff up and be soft to touch.
Boil 1 medium sized potato. Mash it and add to the soaked sabudana. Add roasted peanut powder, cayenne pepper, salt and chopped cilantro and mix together. You can also use green chillies instead of cayenne pepper. Check for taste. Now, make small flat patties and fry in oil till golden brown. Serve hot with green chutney.
 To make green chutney:
Grind together green chillies, lots of cilantro, a tsp or two of roasted peanuts and 1 tsp of jeera. Add salt and a little plain yogurt and serve.
 I love Jackfruits! So, when Jai & Bee of Jugalbandi announced that they had chosen this amazing fruit for JFI-May, I was more than thrilled!! Jackfruit or 'Fanas' as it is called in Marathi can be seen in abundance in the months of May-June in India. Our summer shopping trips were never complete without the purchase of some sweet ripe jackruit (which we call 'Gare'), from the 'thelas' (handcarts) that used to be parked on the roadside, proudly displaying their treasures!
I also love the green raw jackfruit, more than the ripe one frankly. It has a very meaty texture and one needs to develop a taste for it. It is also difficult to cut through the fresh green jackfruit. I remember my mom dipping the knife in oil and smearing some oil on her hands before she cut it. It was a tedious task, but thanks to the canned jackfruit available here, all I have to do is open it with a can opener! Much simpler, right ? :)
My mom used to make a very spicy and delicious curry with raw jackfruit, which I love! But it is a little time-consuming and I did not have enough time to make it this time. So I chose an appetizer recipe from my mom's diary which is relatively quick to prepare and sinfully delicious! Enjoy!!
Jackfruit Kababs
Ingredients: (makes 12 kababs)
Raw Jackruit (1 can) or about 250 gms fresh
Chana dal 1/4 cup
Jeera (cumin seeds) 1/2 tsp
Kaale mire (black peppercorns) 1/2 tsp
Cloves 3
Cinnamon 1/2 a stick
Ginger 1" piece
Garlic cloves 2 big
Onion 1 medium sized
Red dry chillies 1
Green chiilies 1-2 (as per taste)
Cilantro 1-2 tsp
Water about 1 cup
Salt
Method:
If using fresh jackfruit, peel and chop it. For canned, just drain out the liquid. In a saucepan, put to boil the jackfruit pieces in the water along with half an onion, green and red chillies, dal, ginger, garlic, jeera, cloves, peppercorns, cinnamon and salt. Simmer till tender and then let all the liquid evaporate completely.
 Grind to a fine paste in a blender/food processor. Remove the spices that are difficult to grind. Mix remaining onion (chopped finely) and cilantro. Check for taste. Add a little cayenne pepper if its not spicy enough. Mix well and then make small flat patties. These can then either be deep fried in oil or baked in the oven. I generally bake them in a preheated 375 degrees oven till they are golden brown (this can take a while, say 40 mins). Serve with mint chutney.
 (This picture was taken in hurry and hence not great, but I assure you the recipe is very good and it looks better than in this picture...)
My entry for Nupur's 'Q of Indian Vegetables' is 'Quick Tomato Saar'. Tomato Saar is a very popular, Maharashtrian version of a soup. It is commonly found on the menu of engagement functions, weddings, naming ceremonies, etc. Normally, meals on auspicious/festival days are prepared sans onion and garlic and hence, Tomato Saar is an all time favorite on such days. This sweet & sour soup is generally served along with the very traditional 'Masaale Bhaat' or Pulav and is a crowd pleaser. So, the next time you have an impromptu potluck or if you are craving for something simple and quick, try out this appetizing 'Quick Tomato Saar'.
The traditional way of making the Saar involves cooking the tomatoes, cooling them, then running the tomatoes through the food processor and straining out the seeds...whew!! It could take a while to get the tomatoes prepared; and though I do go the traditional way, when I am tired and hungry, I just don't have the patience. So this is where the 'quick' part comes in...
Instead of using fresh tomatoes I use 'Campbell's Low Sodium Tomato Soup' ! It makes life really easy and lunch/dinner really 'Quick'!! :)
Ingredients: (serves 2)
Campbell's Tomato soup-Low sodium 1 small can
Water 1 cup
Cayenne pepper 1-2 tbsp (adjust to your liking)
Sugar 2 tsp
Salt as per taste
To garnish:
Saajuk tup/ghee (clarified butter) about 1 tsp
Jeera (Cumin seeds) 1 tsp
Hing powder (Asefoetida) 1/2 tsp
Grated coconut about 2 tbsp
Cilantro
Method:
Empty the can of soup in a saucepan. Mix in the water to thin it out. Tomato saar is generally not very thick. Next, add the cayenne pepper, sugar and salt. Heat the saar and bring to a boil. Check for taste. You should get a sweet & sour taste.
In a separate small kadhai, heat the ghee(tup) to make the fodni/tadka. To this add the jeera and the hing powder. Pour this over the Tomato Saar. Garnish with grated coconut (I use frozen coconut) and cilantro. Serve hot.
Now wasn't that quick? ;)
 We had the Tomato Saar with 'Masaale Bhaat', of which I will write in my next post.
Variations:
- You can replace the sugar with gul (jaggery). Also, in this case, do not add cayenne pepper. Add coarsely crushed black peppercorns instead, to the fodni (tadka). This is how my mother-in-law prepares it.
- Instead of using grated coconut, use coconut milk. It gives a creamy texture to the Saar.
Friday is already here and I realized that I still haven't sent in my entry for 'P of Indian Vegetables'. I had planned for this recipe a long time back but I had a hectic week, with my hubby traveling, and me being invited for lunches & dinners by my friends...so I had absolutely no reason or inspiration to cook :) I must say I got really pampered with all my friends insisting that I take a break and not cook anything. Lucky me!!! Finally, today morning I decided to try out my recipe and take it for lunch to another friend's place.
The first thing that I think of when I think of the letter 'P' is 'Paalak' (Spinach in English). Nutritionists believe that 'Paalak' is a rich source for iron and vitamins A, C, & E and several antioxidants; hence an absolute essential food in our daily diet. Both my hubby and me love it!! Its a regular in our house. When I was growing up, my parents never ceased to explain the importance of including green leafy vegetables in our diet, and no excuse was ever acceptable for not eating it. But the reason that convinced me the most as a kid was that I would get those envied pink cheeks... :)
So without further rambling I would like to introduce my recipe for 'P of Indian Vegetables'--Paalak Dahiwade (Spinach dumplings in yogurt sauce)! 'Dahi' is the word for yogurt in Marathi/Hindi and 'wade' means round flat dumplings. This is a very easy recipe and something different when you are tired of eating the regular dahiwade(Urad dal dumplings in yogurt sauce). 'Dahiwade' is the perfect recipe for those hot summer afternoons when you don't want to eat a lot of spicy masala dishes. My parents have lived in Madhya Pradesh for many years and this is where my mom learnt this recipe. It goes very well as a side dish or as a snack and is best served chilled. So, with the temperatures soaring, I thought of kick starting my summer with a generous serving of chilled 'Paalak Dahiwade'.
Ingredients:
To make the Wade: (makes about 12 medium sized wade)
Chopped paalak (fresh/frozen) 2 cups
Besan (chickpea flour) about 10 spoonfuls
Cayenne pepper about 2 tbsp
Salt as per taste
A pinch of baking soda (optional)
Oil to fry
To make the Dahi:
Plain dahi (yogurt) about 4-5 tbsp
Water to thin out the dahi
Ginger & green chilli paste about 1 tsp
Sugar 1-2 tsp depending on how sour the yogurt is
Salt as per taste
To Garnish:
Jeera (Cumin) powder
Cayenne pepper
Imli (Tamarind) chutney
Cilantro
Method:
To make the dahi, beat the dahi (yogurt) till it's smooth and lump-free. Then add water to it until you get a sauce like consistency. If by mistake you add too much water, just add a little more dahi to it and mix it in. Next add salt, sugar and ginger-chilli paste to it. Mix well and check for taste. Keep aside.
 The next step is to make the 'wade'. Take the spinach, wash it and chop it finely. If using frozen spinach, thaw it and squeeze out the excess water. To the chopped spinach add salt, cayenne pepper and soda. Next, mix in the besan so as to make a batter. Do not add water while doing this otherwise the mixture will get too watery. The moisture in the washed spinach is enough to make the batter. The batter should be of a consistency where you can make flat balls out of it and fry them in oil. Heat oil in a pan/kadhai. Once the oil is heated, make round flat balls and fry them until they turn golden brown. Remove and drain excess oil by placing them on a tissue paper.
 Make sure to fry the wade immediately after the batter is ready, otherwise, it will get watery.
The final step involves the soaking of the 'wade' in the 'dahi'. Place the wade in a bowl and pour the prepared dahi over them. Make sure that all the wade are covered with the dahi. Cover it and put it in the refrigerator for 2-3 hours at least till the wade soak in the dahi completely. The longer you keep them the better they will absorb the dahi. It can also be done overnight.
 To serve the 'Paalak Dahiwade', sprinkle a little bit of cumin powder and cayenne pepper over them, drizzle some tamarind chutney on top, garnish with some cilantro and just chill!
 Note: If you think that all the dahi has been absorbed into the wade, then just make some more before serving and pour over individual bowls.
 Ingredients:
 Normally, the chillies and potato should be in equal proportion, but today, I have used a little more potato than usual. You can also skip the potato entirely and make this with chillies only. It tastes amazing!


